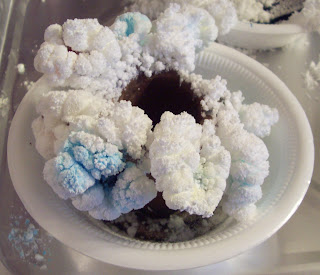
I just did a class on The Chemistry of Crystals for a local elementary school's Saturday Scholars program where we did the Salt Crystal Garden project I did with my kids in 2007. In addition to using cubes of kitchen sponge as a base, we used cardboard toilet paper tubes to make Salt Crystal trees. Since the crystals were just starting to form by the time the class was over, I tested the project out the day before to make sure it would work. It took a while to get going, but the result was pretty spectacular.
The formula we use is an adaptation of the one found on the website for Mrs. Stewart's Bluing. Bluing is a colloidal suspension of very fine blue iron powder in water. Its actual purpose is make laundry white! Although I've listed the changes we made, I never gave the final version of the directions, so here they are:
Materials
• porous base, such as a sponge or cardboard toilet paper tube
• Water: Distilled water is better than tap water.
• Salt: Plain, iodine-free pickling salt works better than table salt.
• Ammonia (NH3): Optional. Irritating to eyes and toxic. Use plain ammonia, not ammonia cleaners.
• Laundry Bluing: Bluing, a suspension of tiny particles of Prussian Blue (Ferric Hexacyanoferrate), makes clothes look whiter by tinting them slightly blue, among other uses. Mrs. Stewart's Bluing is a brand sold in some supermarkets or online at www.MrsStewart.com.
• Plastic cup and plastic spoon: For mixing chemicals. Throw them away when done.
• Disposable plastic bowl: To hold your garden.
• Liquid food coloring.
NOTE: I outfitted the kids with rubber gloves and safety goggles, to make things more scientific.
1. For the sponge, wet with water and wring it out. Cut it into 1-inch sized pieces. Lay them in the bowl. Or cut the top of the cardboard tube into strips and bend them to look like tree branches. Stand the cardboard tube in the bowl.
2. In the cup, mix equal amounts (1 or 2 spoonfuls each) of salt, ammonia, and bluing. Stir until dissolved. For cardboard base, also add an equal amount of water.
3. Pour over the sponge or around the base of the tube. Try to keep it away from the sides of the bowl.
4. Sprinkle on 2 more spoonfuls of salt.
5. Add some drops of food coloring where desired.
6. Garden should start growing in 1 hour, depending on materials and humidity.
7. The garden will keep growing for several days. You can keep adding more salt and more solution. To make it last, don’t knock it or let it get blown, because the crystals will collapse.
Update: I've been adding more water to one of the crystal trees but not the other. Look at the difference in how they've developed. The tree that was watered is spiky, while the other is puffy!


3 comments:
Someone tweeted about this post - and your site is JUST what I need! My 8 year old has been chemistry crazy all weekend - wants to learn all about chemicals & reactions! Thanks for directing me!
Cyndi
www.MidShoreLife.com
Thanks for this. I was just today looking for projects I can do with my 9 year old son.
Those look great! My daughter bought a $2 kit yesterday that makes a tree. It did well, but I think we're going to have to try these versions, too. And, I'm teaching a chemistry co-op next year so I'm excited about finding your blog!
Post a Comment