Saturday, November 13, 2010

Flower Chemistry

Over at GeekMom, we've gotten some great responses to Mythbuster Kari Byron's post about getting kids excited by science. One commenter, who only gave the name "OrchidGrowinMan," provided directions for a flower chemistry party he organized for his daughters. It sounds so interesting, I thought I'd share it here. Maybe we'll get to try it sometime ourselves.

Years ago, I hosted a “Science Party” for my eight-year-old daughter to test flowers from our garden for acid/base color indicators. Ten of her friends came over, and spent HOURS at it, skipped lunch (!) and some had to be dragged away. The agenda was to gather flowers and such from the gardens and greenhouse (orchids too!) and smoosh them in a mortar and pestle with a bit of rubbing-alcohol (When I was a teenager, I experimented and found this to be the BEST solvent for this purpose). Then a dropper could suck-up the (usually) colored solution to put a few drops into each of three tubes, adding acid to one, water to one, and alkali to the third. I had bought each of them a set of safety goggles, plastic droppers and a rack of 25 little plastic test-tubes to take home (surplus).

Some surprises came up, like the prevalence of flavonoids that turn yellow with strong alkalis (so some samples go red-purple-blue-green with increasing pH). They're the reason why when you wash your hands after handling tomato plants the soap turns yellow: You can easily collect lots of some weird pigment by stroking tomato stems with a cotton-ball, and it turns bright greenish-yellow in alkali.


Materials were obtained from American Science & Surplus at good prices:
American Science & Surplus
3605 Howard street,
Skokie IL 60076
(847) 982-0870
http://www.sciplus.com/

List of Materials
  • Safety Goggles  $2.25 ea.
  • Test Tubes (at least five)  $1.75 ea.
  • Test Tube Rack
  • Mortar and Pestle  $13.95 ea.
  • Droppers Provided  $2.00/20.
  • Acid: distilled vinegar, lemon juice
  • Alkali: household ammonia, baking soda
  • Solvent: rubbing alcohol
  • Apron or Lab Coat Recommended
  • Pigmented plant parts: flowers, berries, pods.
  • Acidic foods like fruits, alkaline like soda- or shortbread or cake.
  • Miscellaneous, if available and needed: Ph Meter, Litmus paper, Acid/base indicators, tincture of iodine
What Will We Do:
1. We will do experiments to try to extract the colours from plant parts like flowers, leaves and fruits.
2. We will then determine if these chemicals change colour when they are mixed with acids and alkalis. That is, are they acid/base indicators.
3. Using any acid/base indicators we find, we will try to identify whether some foods are acidic or alkaline (basic).

Procedures (The three experiments can be run concurrently):

Experiment 1
  1. Obtain a pigmented plant part, the darker the better. The dryer the better. If possible, cut away any uncoloured parts.
  2. Smoosh and Goosh it up in a mortar and pestle.
  3. Add a little rubbing alcohol and carefully grind it up some more.
  4. Pour, or use a dropper to remove the liquid to a test tube. Label the tube. What does it look like?
  5. Wash the mortar and pestle and repeat.
Experiment 2
  1. Put a few drops of the extracted pigment from experiment 1 into each of five test tubes.
  2. Put three drops of ammonia or baking soda solution in the left test tube. What happens?
  3. Put three drops of vinegar or lemon juice solution in the right test tube. What happens?
  4. Put one drop of ammonia or baking soda solution in the next to left test tube, and two drops of water. What happens?
  5. Put one drop of vinegar or lemon juice solution in the next to right test tube, and two drops of water. What happens?
  6. Put three drops of water in the center test tube. Compare the colors of each sample.
  7. Put a few drops of the extracted pigment from experiment 1, one that changes colours, into each of five test tubes.
  8. Put three drops of ammonia solution in the left one, three drops of baking soda solution in the next. What happens?
  9. Put three drops of vinegar in the right one and three of lemon juice solution in the next. What happens?
  10. Put three drops of water in the middle tube. Compare the colours.
  11. Using the results of the experiment above, if you add a drop of vinegar to the left (ammonia) tube and a drop of water to the middle one, and a drop of ammonia to the right (vinegar) tube, how many times do you have to repeat to get them the same colour?

Experiment 3

  1. Obtain a food (or other material) sample.
  2. Put a few drops of the extracted pigment from experiment 1, one that is shown to be an indicator, onto the sample. What happens. Is the sample acidic or alkaline?
Why Does That Happen?
The pigments in plants fall into one of several chemical families. Blue, purple, pink, and most red colours are due to the presence of one or another of the anthocyanin pigments, which are acid/base indicators. [antho means “flower,” cyanin means “blue.”] Their molecular shape changes in response to acidity, and this changes their colour. Some blue flowers have the same anthocyanin pigment as some pink ones; the difference is in the acidity/alkalinity (pH) of the plant juice. Vinegar and lemon juice are acidic, ammonia and baking soda alkaline. Float flowers in them and the flowers will likely change colour.
Anthocyanins are soluble in water and alcohol and are easy to extract, They also are usually easily destroyed by heat (cooking). Beets and chard (and cacti) have pigments in a different group, betacyanins, which are more heat stable and are also (barely) indicators. [Beta means “beet.”]
Yellow, orange and some red pigments (as in tomatoes) are due to carotenoid pigments, which are not acid/base indicators, and are not really soluble in water and sparingly in alcohol. [carota means “carrot”] Green chlorophyll and various brownish pigments may also be present.

There are other experiments that can be done: baking soda combined with an acid makes bubbles (carbon dioxide), tincture of iodine from the medicine cabinet gives a black/blue colour on starch and can be used to detect starchy foods and where in a plant starch is stored.

Sunday, October 3, 2010

Now Blogging at GeekMom with Mythbuster Kari Byron!

I've been busy the past few months helping to launch GeekMom, a site dedicated to moms who want to share their geeky passions with their kids. To start us off, we've got MythBusters host Kari Byron writing about her new adventure as mom to a one-year-old girl. Kari is also the host of the new hour-long kids' show Head Rush. Check us out!

And I'll still be blogging at GeekDad, so be sure to stop by there too!

Saturday, September 4, 2010

The Buckyball is 25 today!


Google's animated doodle alerted me to this milestone in modern chemistry. Buckyballs, discovered in 1985, are carbon molecules that are exceptionally strong and light. They're used in carbon fiber bike frames and a whole host of other cutting edge products. We saw the original inspiration, Bucky Fuller's geodesic dome, on a trip to Montreal.

Check out my post on GeekDad.

Monday, May 10, 2010

Discover Magazine is Looking for Home Experiment Videos!


Unfortunately, all our best videos are just a couple seconds long. But if you're interested:

DISCOVER is currently producing a Web TV show about home science experiments and demonstrations, and we're looking for submissions—the most enlightening, visually impressive, surprising, or just plain funny videos out there. Submit your video below (it's OK if you've already uploaded it elsewhere on the Web) and we'll select the best ones for the show. (Winners will of course be identified.)

For more information, go to the Discover Magazine website.

Friday, April 9, 2010

Lots of Periodic Tables

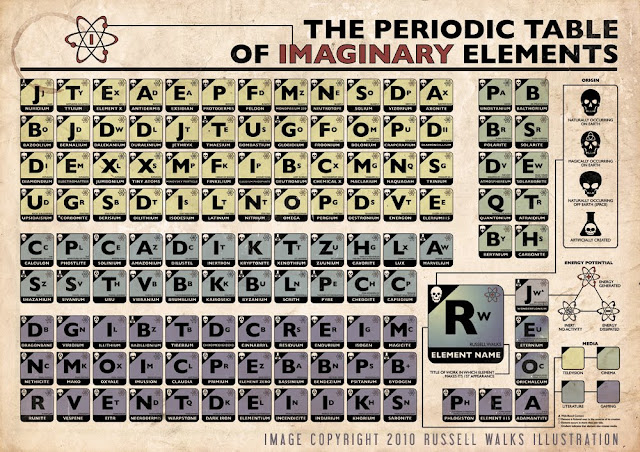
Just a pointer post to an interesting post by my fellow GeekDad writer Nathan Barry on some creative versions of Periodic Tables, including illustrator Russell Walks' cool-looking Periodic Table of Imaginary Elements.

Sunday, March 21, 2010

Salt Crystal Trees

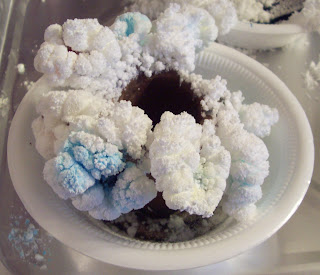
I just did a class on The Chemistry of Crystals for a local elementary school's Saturday Scholars program where we did the Salt Crystal Garden project I did with my kids in 2007. In addition to  using cubes of kitchen sponge as a base, we used cardboard toilet paper tubes to make Salt Crystal trees. Since the crystals were just starting to form by the time the class was over, I tested the project out the day before to make sure it would work. It took a while to get going, but the result was pretty spectacular.

The formula we use is an adaptation of the one found on the website for Mrs. Stewart's Bluing. Bluing is a colloidal suspension of very fine blue iron powder in water. Its actual purpose is make laundry white! Although I've listed the changes we made, I never gave the final version of the directions, so here they are:

Materials

• porous base, such as a sponge or cardboard toilet paper tube
• Water: Distilled water is better than tap water.
• Salt: Plain, iodine-free pickling salt works better than table salt.
• Ammonia (NH3): Optional. Irritating to eyes and toxic. Use plain ammonia, not ammonia cleaners.
• Laundry Bluing: Bluing, a suspension of tiny particles of Prussian Blue (Ferric Hexacyanoferrate), makes clothes look whiter by tinting them slightly blue, among other uses. Mrs. Stewart's Bluing is a brand sold in some supermarkets or online at www.MrsStewart.com.
• Plastic cup and plastic spoon: For mixing chemicals. Throw them away when done.
• Disposable plastic bowl: To hold your garden.
• Liquid food coloring.

NOTE: I outfitted the kids with rubber gloves and safety goggles, to make things more scientific. 

1. For the sponge, wet with water and wring it out. Cut it into 1-inch sized pieces. Lay them in the bowl. Or cut the top of the cardboard tube into strips and bend them to look like tree branches. Stand the cardboard tube in the bowl.
2. In the cup, mix equal amounts (1 or 2 spoonfuls each) of salt, ammonia, and bluing. Stir until dissolved. For cardboard base, also add an equal amount of water.
3. Pour over the sponge or around the base of the tube. Try to keep it away from the sides of the bowl.
4. Sprinkle on 2 more spoonfuls of salt.
5. Add some drops of food coloring where desired.
6. Garden should start growing in 1 hour, depending on materials and humidity.
7. The garden will keep growing for several days. You can keep adding more salt and more solution. To make it last, don’t knock it or let it get blown, because the crystals will collapse.

Update: I've been adding more water to one of the crystal trees but not the other. Look at the difference in how they've developed. The tree that was watered is spiky, while the other is puffy!


Monday, January 25, 2010

A Little Nanoscience Cross-Posting


We did one of the nanoscience experiments from NISE Net and posted it on Home Physics. This bit of Kitchen Nanoscience demonstrates how difference in scale affects forces like gravity. It's quick and easy, if you've got some dollhouse or LEGO-sized drinking vessels around!

Home Chemistry in Chemical & Engineering News!


As promised, Chemical & Engineering News has an article mentioning our hand warmer experiment. Check it out!

Monday, January 4, 2010

What's That Stuff? The Chemistry of Everyday Products


I was just interviewed for the What's That Stuff column of Chemistry & Engineering News, the weekly magazine of the American Chemical Society. Apparently, this blog is the first thing that comes up when you Google "chemistry" and "hand warmers." How cool is that! Looks like they have some interesting articles too. Can't wait to see it!

Saturday, January 2, 2010

Home Chemistry Experiment Links

I've started a new category in my sidebar for links to chemistry experiments you can easily do at home. They include some activities from NiseNet, the Nanoscale Informal Science Education website. While these are designed for museums and schools, many of them are easy to do at home too. I've already printed out the paper model Bucky ball to try later!