Tuesday, January 29, 2008

Kitchen Chemistry for (Big) Kids


Guacamole, Death by Chocolate Cookies, Scones and Tea ... I can't wait to try some of the recipes, I mean experiments, in the Kitchen Chemistry online course offered by Dr. Patti Christiethrough MIT's Open Courseware website.

Most Kitchen Chemistry is aimed at little kids. This course has you thinking about the molecular basis for building up resistance to the heat of the jalapeno peppers, how copper helps holds together the molecules that make up meringue, and the scaffolding of dough formation.

And from the look of the photo from their class website, it looks like these college students are having fun!

The book used is considered a classic of cooking AND science: On Food and Cooking: The Science and Lore of the Kitchen. I've just added it to my list.

Saturday, January 26, 2008

Penny chemistry - Verdigris and copper plating

Lesson: Copper plus oxygen creates copper oxide (2Cu+O2-->2CuO )
What Happened: Changing the chemistry of pennies and nails changed their color

Anthony (perhaps inspired by a discussion of the construction of the Statue of Liberty in history this week) wanted to see if he could make a penny turn green by soaking it in water. I suggested we also try vinegar. Nothing very dramatic happened, so I looked it up and found this great demonstration on About.com's Chemistry page:
  1. First we mixed 1/4 cup vinegar with 1 teaspoon salt.
  2. Next we dipped one dull penny in for 10 seconds, making it half shiny.
  3. Then we dumped about 20 dull pennies in the solution for 5 minutes.
  4. When the pennies were removed, some were rinsed with water, the rest left to dry as is. Within a couple of hours, the vinegary pennies had developed a nice verdigris finish.
But here's the best part. Once we took out the pennies, we put some steel nails (I couldn't quite tell if they were galvanized -- zinc-coated -- or not) in the vinegar. Over the next few hours, the nails got a beautiful copper coating. Here's Anne Marie Helmenstine's explanation of what happened: The pennies react with the salt/vinegar solution, releasing positively charged copper ions. The vinegar also dissolves the iron and oxides on the surface of the steel nail, giving it a negative charge. The positively charged copper ions are more strongly attracted to the nail than the iron ions, so a copper coating forms on the nail.
During the process, the hydrogen ions from the vinegar (acetic acid) and the metal/oxides produced bubbles of hydrogen gas.

Although it took longer than advertised, the end result was impressive. Most impressive was finding a way to do copper plating without using CuSO4 (one of the caustic copper sulfate experiments from Joy of Chemistry that I had been avoiding doing).


Update: Works on paperclips, too!


Here's a site that gives all the chemical equations involved.

Friday, January 25, 2008

Extracting DNA at the Tang


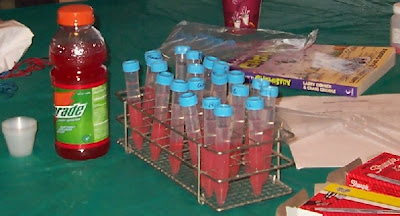
We had a lovely visit to the Molecules that Matter exhibit at Skidmore College's Tang Museum in Saratoga Springs this week. Ginger Ertz, the museum educator, had a DNA extraction kit from Carolina Biologic Supply she wanted to try with our homeschool group.

First we obtained cheek cells by swishing with a little Gatorade while gently biting the inside of our mouths. Then we spit the solution (all the kids actually abided by the instructions NOT to spit through the air!) into little medicine cups, mixed the Gatorade with some other chemicals in a test tube and took a tour of the exhibit while it sat awhile.

Exhibit curator Ray Giguere, an organic chemistry professor at Skidmore, had agreed to give our group a private tour. After the public tour we attended in the fall, I thought it would be really worthwhile, and it was. He even invited one of the parents to audit classes with her teens. He started at the DNA model, went over the plastics and nylon sections we had seen last time, and managed to squeeze in a little info on the Bucky balls. The models you see above are actually dog toys!

The DNA we extracted was replicated into long gooey strands that resembled jellyfish. We sucked them up into pipettes and put them in tiny vials to wear around our necks. I got a little Gatorade in mine.

You can get DNA kits from many suppliers, or make your own.
Rice University's crimesolving website for kids (see below) has a downloadable family activitity brochure with directions for extracting DNA from strawberries. Or you can use different plant material using these directions from the University of Utah. Try it!

Monday, January 21, 2008

Redox Reactions Part Deux

Lesson: Fire produces CO2
What Happened: Hydrocarbon + oxygen = carbon dioxide + water + heat

According to The Joy of Chemistry: The Amazing Science of Familiar Things (pages 79-81), combustion chemistry is another redox reaction. In this one, a hydrocarbon (a compound made solely of hydrogen and carbon) mixes with oxygen. The carbon is (literally) oxidized, losing electrons to the oxygen atoms, and the oxygen gains enough electrons to attract the hydrogen into forming H2O. Here is what we did:
Materials

Safety goggles
Rubber gloves
Votive candle
Wooden match
2 small clear glass jars
Water
Fish tank indicator
Piece of white paper
Balloon
Drinking straw
Ice cube
1. Pour 4 teaspoons (20 ml) of water into a glass.
2. Add 2 drops of fish-tank pH indicator.
3. Put the glass and one of the empty glasses on a white piece of paper. The water should look faintly green-blue.
4. Light the candle. Invert the empty glass over it. Allow the flame to burn out.
5. Turn the glass over and IMMEDIATELY pour the water solution into it.
6. QUICKLY cover the glass with your hand. Swirl the solution around to mix with the gases from the flame.
7. Put the glass back on the paper. It should have changed color.
8. To test that CO2 was the cause of the color change, make another indicator solution as before in clean glass. Blow up a balloon and pinch closed. Put a straw into the opening of the balloon so that the gas goes into the solution. It should change color the same way.

We also did the next demonstration, to prove that fire produces H2O (page 80):

Materials

Votive candle
Wooden match
1 small clear glass jar
Ice cube
1. Light the candle. Hold the glass over it. Place an ice cube on top.
2. Water will condense inside the glass.

Saturday, January 19, 2008

DNA Analysis for Kids


We will be visiting the Tang Museum's Molecules That Matter exhibit this week for the second time. This week's program will focus on DNA. In preparation, I'm going to be showing my kids some websites about DNA analysis which I found for a Family Online column on Crime Solving for Kids. We will be extracting our own DNA. Sounds cool...

Thursday, January 17, 2008

Redox Reaction Demonstrations

Lesson: Iron can take the form of two different ions in redox reactions
What Happened: Fe2+ + H2O2 → Fe3+ + H2O + O2
Ferrous iron + hydrogen peroxide → ferric iron + water + oxygen

Today we did some experiments from The Joy of Chemistry: The Amazing Science of Familiar Things (Demonstration 3, Stop-and-Go Chemistry, Page 73) which demonstrated reduction/oxidation, or redox, reactions. In reduction, electrons are gained, creating a negative ion. In oxidation, electrons lost (often involving oxygen), creating positive ions.

In preparation for this experiment, we first made up a batch of iron acetate, as instructed in the front of the book. Wearing Playtex gloves, John pinched off about a cubic inch of fine steel wool. We dropped it into a jar with 2 cups of vinegar and left it to soak for 24 hours. You could see bubbles of what the book says is hydrogen coming off the steel wool ball, which first floated on the top, then sank, then floated up again. (I did not try to ignite the hydrogen, although I thought about it.)


Ingredients for Iron Acetate

Then today, we gathered the following:

Safety goggles
Rubber gloves
Plastic bowls
Teaspoon
Iron acetate solution
Household ammonia
Hydrogen peroxide

First we
ladled 2 tablespoons (30 ml) iron acetate into the bowl. Then we added 1 teaspoon of ammonia to make it turn red. But we found that the color was hardly noticeable. So we added a total of 5 teaspoons. You can see the difference below:


Left: 1 teaspoon ammonia. Right: 5 teaspoons ammonia

Next we dropped in 1 teaspoon (5 ml) of hydrogen peroxide, to turn the solution green. Just the one teaspoon was enough to make the solution the nice dark color.

Since we had set up two bowls (one for each boy) we were able to compare the color change.


Here is what iron acetate looks like chemically:

Fe3O(OAc)6(H2O)3]OAc (OAc is CH3CO2-)


Anthony helped me with this post. More redox experiments tomorrow!


Wednesday, January 16, 2008

Alum Update

While we're waiting for the lemon battery do-over (and possibly other redox experiments), I thought I'd take another look at what the alum crystals are doing.

John had to stop growing the clear crystal when the string broke before Christmas. Anthony is still growing his green crystal, but it's getting ... kind of mushy. I think it has to do with the new solution we put it in.

We tried to make more "alum juice" by taking all the grains of alum we saved after siphoning off the liquid from time to time. Anthony warmed the juice in the microwave so that the alum would dissolve, but I think he let it get too hot. We left the cup of juice to cool to room temperature and went out for the day. (If we had put the big crystal back in the juice when it was still warm, it would have dissolved, because the warmer liquid could take more alum into solution.)

When we got back we found the big chunks of alum you see here. They're sort of deformed, I believe because they formed too fast for the crystal structure to develop nicely. It's interesting that they kept the green food coloring as well, which the slower growing crystals didn't (once they had dried). We may dissolve them and try again.

Friday, January 11, 2008

Lemon Battery, Take 1


Lesson: Electrochemical redox reactions
What Happened: Copper ions are reduced by acidic lemon juice as zinc is oxidized into zinc ions, moving toward a more stable state and producing electrical energy.

It's the new year, I've finally gotten a replacement for my dearly departed laptop and managed to wrest it into a configuration that allows me to sign in to my blog, so it's time to post more experiments.

The Lemon Battery is one I've been thinking about doing for years. There are many versions of it -- and many opinions about whether it actually works. Here are some of the different incarnations and explanations:
  • PBS ZOOM
  • Energy Quest (from the California Energy Commission)
  • Hila Road (a science camp in Canada that offers directions, including videos, for many experiments)
  • Bad Physics (why the textbook lemon battery doesn't work)
As usual, I took bits and pieces and put together a version that looked the easiest for us to do. Last summer I was hoping to work it into an alternative energy class I taught for the day I talked about how electricity works, and so I had bought copper and galvanized (zinc-coated) steel wire. I liked the idea I had seen about putting small lemons into an egg carton to create a bigger battery of cells, thereby upping the voltage and current. We had a bunch of lemons, but they were pretty large, so I had the kids cut them into quarters (per Hila Road's instructions).

We rolled the lemons, without breaking the peels, to release the juice inside, cut up the lemons and put them peel side up in the egg cartons. Then we connected the lemon quarters into groups of four, using a piece of copper and a piece of zinc wire for each lemon cell. At that point we had six batteries of four lemon cells each, which according to Hila should have produced enough voltage and current to light an LED bulb.

At this point any semblance of scientific accuracy breaks down. We never got the LED bulb to light. Ditto for the small watch-battery-powered calculator we tried. We did get readings on our multimeters, but I couldn't tell which was which. (I need to look at the instruction sheet to see which scale goes with what measurement.) And I tried to wire the 6 batteries of 4 cells in parallel, but realized afterward that I just connected the batteries in series, so maybe the amperage wasn't high enough.

The kids wandered away at this point, but I want to try this one again (of course). I may use pennies (most places recommend sanding them a little) and galvanized nails as terminals, and just hooking the wire up between the terminals. And I'll have to look up (or ask my dad) about how to wire the batteries in parallel correctly.

For a look at people who DID make this experiment work, go to the links above. Or for a really amazing feat funny takeoff on this idea, go to GeekDad to see my post about the onion/Gatorade battery.